Note: All information is based upon Windows operating system and Lightroom 2.2
In part 1 we learned about keywords and about creating a hierarchy for your keywords. The reason this was covered before adding keywords to your photos is that you should create your basic top level keywords before starting to apply keywords. Lightroom provides many options for keywording, and depending on how you work some work better than others. If you do very little keywording, my approach may not be the best for you. If you want to actually create a workflow to add consistent and accurate keywords to a large number of photos, you will want to keep reading.
At the time that I a writing this I have over 62,000 photos in my Lightroom catalog and I am working on keywording them, going back about 7 years. Most of the books and tutorials I have read will start with an empty keyword list or only have a very few keywords, and many of the authors are simply giving instructions on how to work the software. I will show you what is working for me and my approach to applying keywords in a real world catalog.
Lightroom makes keywording so easy, that it can be very complicated. Ok, it is easy but there are so many ways to keyword that learning all of them is complex.
Ways to enter keywords in Lightroom:
On Import
Add keywords at time of import
Lightroom will import existing keywords
Using the Keywording Panel
Click here to add keywords
Keyword suggestions
Keyword Set
Directly edit the keywords in the Keyword tags
Using the Keyword List
Drag photos to keyword
Drag keyword to photos
Checkbox next to keyword
Create new keyword and add selected photos
Using the Painter tool
Read Metadata from file after adding keywords with other software
Sync Metadata
Using the Photo Menu
add keyword
set keyword
Using the Add Keyword Shortcut
Using Keyword Synonym
I am not going to give full instructions on how to do all of this in this post (it could easily be a full chapter in a book). What I will do is to explain my normal workflow for keywording photos that I import from my card right after a photo shoot.
My Lightroom Keywording Workflow
Step 1
Import photos to catalog. This is something that I do after every shoot, even if it is only a few shots. This keeps my photos all relaeted to one shoot and makes keywording much easier. In the import window, I will enter only keywords that apply to every image and only enter keywords that will “Auto Complete”
Very Important Note:
Using “Auto complete” is an essential step to maintaining a proper hierarchy. When you enter keywords in the “keywords” box on import or in the “click here to enter keywords” space in the Keywording Panel, Lightroom will search the database for matching entries and let you choose from this list. When it applies the keyword from the list, you get the nested keyword in the hierarchy. If you do not use the auto complete you add the keyword at the root level and have a duplicate entry.

Step 2
Note: Keywording should be done in the Library Module and in the Grid view (if you are not in Grid View selecting multiple photos will not apply the keywords to all photos selected).
I make an initial pass through all the imported photos and mark any obvious rejects by hitting the X key. I will then choose “photo” from the menu bar and choose “Delete Rejected Photos” and delete them from my hard drive. Now, I do not have to mess with these again.
Step 3
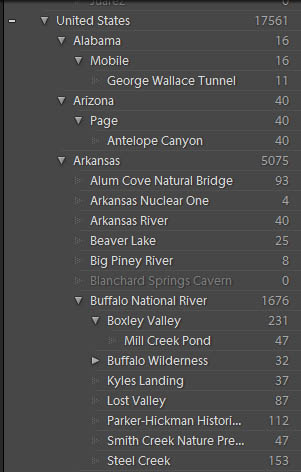
I will apply a location keyword to all photos, by clicking on one photo and then Ctrl + a to select all (assuming they were all from the same location). I use keywords for location (instead of using the IPTC location information) because I can be very specific about a location by adding only one keyword using the hierarchy. This location is not in my keywords because it is a new location for me. The location is “Eden Fall’s” Which is located in “Lost Valley” on the “Buffalo National River” in “Arkansas” in the “United States”, however I have been to Lost Valley before and have a keyword for that location.

I will right-click on the “Lost Valley” keyword and it will bring up the following choices.

I will then choose “Create Keyword Tag inside “Lost Vally”…”

I will then add “Eden Falls” in the Keyword Tag: entry box. Since I have the checkbox “Add to selected photos” marked it will apply to all of the photos because I have already selected them.

You can now see the new tag under “Lost Valley” for Eden Falls showing the number of photos with the keyword. (There is only one photo because I created the keyword only for this illustration)

If you look in the Keywording Panel and select “Will Export” you will see all of the keywords to show the location of the photo. (Lightroom sorts the keywords alphabetically)
Step 4
I now look at the first photo in the import and see that it is a waterfall. Not all the shoots are actually of a waterfall, so I scroll through holding down the “control key” and clicking on all of the waterfall photos. I already have a keyword for “Waterfall” but I may not remember exactly where in the hierarchy it is.

At the top of the Keyword List Panel you will see a magnifying glass followed by “Filter Keywords”. Click in this box and start typing the keyword you want, and it will begin filter through all your keywords for a match.

You can now see exactly where your keyword is and then click on the “Waterfall” keyword and drag it to the library, drop it on one of the selected photos and it will tag all of them. (You could also click on one of the photos and drag it to the keyword)
I will continue this process until I have applied all the keywords to the first photo (and all others that get those keywords). I will then move to the next photo and apply any keywords not used on the first photo, again selecting all additional photos to get that keyword. I continue this process through the entire import.
By using this process I do not lose track of what photos I have keyworded and which I have not, and do not create duplicate keywords.
I hope that this will be of help. This is by no means the only way to keyword photos and I use many of the other methods at times.
Please leave comments on whether this is usefull or methods that work for you.
Great Places for Great Photos
Let me help you to find a great location for your next photography adventure. I will list many lesser-known destinations, as well as the famous "Icon Locations" for photography. I will provide photos (Lots of Photos), location information, consisting of what there is to photograph as well as other information about the destination. I will give costs, maps, directions, contact information, and other essential information for a successful photo trip. I will only post for locations that I have personally photographed to ensure a quality guide to great locations for photography. If you know of great places that are not posted, please send me the details, I may just decide that is a place I need to go!
 Greg Disch is a freelance photographer located in Arkansas. Greg specializes in nature, scenic, wildlife, and other outdoor subjects in Arkansas and other areas of the country. Most of the images on this site are available for sale as prints, personal use, or rights managed stock photos.
Greg offers both classroom instruction and in the field hands on photographic workshops. Classroom sessions are normally held in Fort Smith Arkansas, but arrangements can be made to bring a class to your group.
All classes and workshops have small class sizes designed to provide an optimum student to instructor ratio, where you can get the personal attention, you need. Most classes and workshops are limited to a maximum of six participants and will be held with a minimum of only two.
If you are looking for a wonderful opportunity to get personal individual instruction, I do private workshops and classes at a location of your choice, whether doing a location photo shoot, coming to your home or business, traveling across the country on a road trip, or at my classroom. This is a fantastic way to learn digital workflow and be sure that your computer equipment is properly configured for optimum performance.
Do you know is it possible to make list like this:
– Countries
– Country 1
– Country 2
– Place on country 2
– Place 2 on country 2
and when you add “Place 2 on country 2” keyword to your photo it would automatically add “Country 2” too?
Greg, Thanks for sharing this keyword information.
Never mind the post that I just made. I figured it out and already created my “more” organized keywords. Now the thing is, if I import, all of my keywords will be messed up!
Any work around to this?
If you import your photos with keywords attached that are not in the hierarchy, they will show up in the keyword list at the root level. At that point you can either drag the keyword into the hierarchy or select the photos by clicking the arrow to the right of the keyword in the keyword list and then applying the correct keyword from the hierarchy and then delteting the unwanted keyword.
If you simply want to start over with no keywords, create a new catalog and import all the photos, then select all photos and in the keywording panel highlight and delete all the keywords. You can then go under Metadata on the tool bar and “Save metadata to file”, close the new catalog and open your nornal catalog and import the photos without the keywords.
Hi,
Will it be possible to tell us how to create the actual hierarchy before even applying to the pictures so that we have something in place to work with.
I have already tagged about 4,000 images and have a list of keywords but is not in a hierarchy.
Thanks.
Hi, cool site, good writing 😉