
Shark Reef Aquarium, Las Vegas NV
Massive public aquariums are sprouting up in major cities all over the country, and are a great way to see the undersea world without having to travel to the ocean and learn to scuba dive. Being a photographer you want to be able to photograph the experience, and if you have tried you probably found that this is harder than it looks. This article is to help teach you some of the techniques used to be able to capture the fantastic undersea world while on dry ground.
Most public aquariums offer many obstacles to photographers:
- Low Light
- Limited mobility
- Fast moving subjects
- Crowds of people
- Restrictions on use of flash and tripod
And then add to that the complexities of shooting through water, which is a lot different than shooting through air. Shooting in an aquarium is basically the same as shooting underwater, except that you do not get wet. The biggest issue when shooting underwater is lighting, light does not travel well in water. In addition the water acts like a blue filter and absorbs the reds and greens.
There is no one sure fire method to shoot an aquarium, each one is different, and each tank is different. Lighting conditions, water quality, the size of the tank, and many other factors all play a role in choosing the best method.

Use Digital Camera
First off I know some of you are going to say, I can shoot with film, and yes you can but there are some great advantages to using a digital. When shooting an aquarium you will have a low percentage of good shots, with digital there is no cost to shooting hundreds of photos to get just a few keepers. Digital offers the ability to use high ISO’s that you cannot get with film. Your images need to be edited on a computer to obtain the best image. Evan if you do not normally edit your photos, when shooting underwater you lose color and saturation which editing can restore.
Unedited Image

- Edited Image, with color and saturation restored.

Equipment
Choosing your equipment can make the difference in a successful shoot. One of the concerns is that you will be in a crowed area without much room to work, low lighting, and need to do a lot of moving around. It is best if you can carry all your equipment and keep your hands free to work. A photo vest, belt system, or fanny pack work well. Try to avoid bags that you have to take off and set down to access equipment , both because they will be in the way of other people and they may tend to walk off on their own.
Tripod/Monopod
Shooting in low light, a tripod may be your first thought, however it may not work as well as what you would expect. A tripod will do a great job of steadying your camera, but does little to steady the subject, swimming fish. A tripod takes a lot of room to setup and is a trip hazard for others. A mono pod may be a better choice for the aquairium as it takes very little space and is easy to maneuver and will work well at shutter speeds fast enough to catch a moving fish.
Lens
A wide angle lens will work best for most aquarium shooting, you need to be close to the glass and close to the subject, a wide angle will give the fish room to move and not swim out of the shot. The faster the lens the better, you are shooting in low light and need a large aperture, image stabilization is also a great benefit. An internal focusing lens is best, (a lens that the front does not move when you focus) this way you can press the lens against the glass to steady the camera and avoid reflections. This will also make any scratches in the glass go out of focus and not show in the photo.

Using a flash
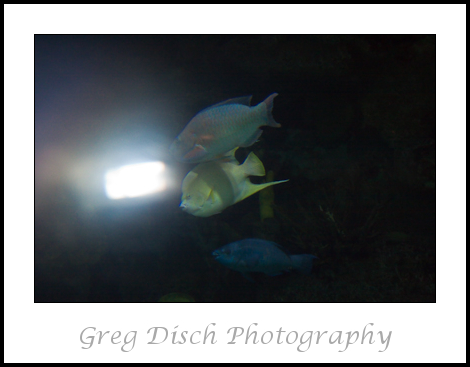
Using a flash in an aquarium can work well under the right conditions. Light falls of exponentially in water, your hot shoe flash will work on land at a distance of 15′ or more, but will only work well underwater at a distance of about 3-4 feet, and just a few inches difference in the distance to subject can cause a significant change in lighting. Notice in the photo below how the fish on the left side of the image are almost completely dark, evan thou they are only a couple feet behind the front fish.


Back scatter, light reflecting off particles in the water is another problem with flash photography underwater. The flash needs to be shot from the side at near a 45 degree angle for best results. Another issue is reflection from the glass of the aquarium, this means that you need to get the flash off the camera with a remote cord or wireless flash transmitter.

Camera Settings
ISO
Set the ISO to the lowest setting that will give you a fast enough shutter speed to freeze the motion in the frame. Shooting an aquarium with low light this setting may be the highest that you have ever set it. Many of the photos in this article were shot at ISO of 3200. If I have to choose between a photo with noise or a blurred image, I’ll take the one with noise. I also believe that in the future we will have software that will greatly improve a noisy photo, while I doubt we will be able to fix a blurred photo.
File Format
If you can this is the time to shoot in RAW, this will give you more information for editing your photos, remember they do need to edited. If you can not shoot in RAW, then use the highest quality setting that you can on your camera. If you are unsure of all the quality settings and what they mean, the easiest way to know when you have the highest quality is when your camera LCD shows the lowest number of available shots.
Continuous Shooting Mode
Set your camera to the highest speed continuous shooting mode. When shooting a burst of photos by holding down the shutter button you increase your chances for a sharp image because you are not moving your finger and pressing the shutter button for each shot. Remember shooting digital the extra shots cost nothing, delete them later.
Focus
Most of the time you will do better to turn off the auto focus on your camera. Most cameras auto focus systems do not work well in low light, shooting through glass, or shooting through water. Any of these can cause problems with the auto focus, and we are combining all three. Pick the area you want and pre-focus manually and then wait for the fish to move into the area.
White Balance
I suggest using auto white since there will probably be mixed light sources and possible different colored lights for effect in the tanks. This is also one of the HUGE advantages of shooting in the RAW file format, you can adjust the white balance later when editing with no loss of information.

Technique
Don’t chase fish, many of the fish in aquariums will become repetitive in their behavior and follow the same path around the tank, learn the patterns fish follow, set up and be ready for them when they swim into the frame. Be patient, you will have to spend some time and take many shots to insure success, but it can be done.

Photograph more than just fish, all those people that are in the way blocking your view of the tank, can make for excellent subjects themselves.

Don’t overlook the architecture of the aquarium itself, most of these are works of art in themselves.

The ocean looks blue because water – even when very clear – absorbs and filters out the red side of the color spectrum. So naturally our pictures will all look blue. The closer the camera is to the fish the less loss of color, this is why we use a wide angle lens and then edit to add the warm colors back into our photos.

And the last tip, be sure to shoot the Jelly Fish, I think they are the coolest thing in the aquarium!


Great Places for Great Photos
Let me help you to find a great location for your next photography adventure. I will list many lesser-known destinations, as well as the famous "Icon Locations" for photography. I will provide photos (Lots of Photos), location information, consisting of what there is to photograph as well as other information about the destination. I will give costs, maps, directions, contact information, and other essential information for a successful photo trip. I will only post for locations that I have personally photographed to ensure a quality guide to great locations for photography. If you know of great places that are not posted, please send me the details, I may just decide that is a place I need to go!
 Greg Disch is a freelance photographer located in Arkansas. Greg specializes in nature, scenic, wildlife, and other outdoor subjects in Arkansas and other areas of the country. Most of the images on this site are available for sale as prints, personal use, or rights managed stock photos.
Greg offers both classroom instruction and in the field hands on photographic workshops. Classroom sessions are normally held in Fort Smith Arkansas, but arrangements can be made to bring a class to your group.
All classes and workshops have small class sizes designed to provide an optimum student to instructor ratio, where you can get the personal attention, you need. Most classes and workshops are limited to a maximum of six participants and will be held with a minimum of only two.
If you are looking for a wonderful opportunity to get personal individual instruction, I do private workshops and classes at a location of your choice, whether doing a location photo shoot, coming to your home or business, traveling across the country on a road trip, or at my classroom. This is a fantastic way to learn digital workflow and be sure that your computer equipment is properly configured for optimum performance.
